Filming and Video Tips For Entrepreneurs, EDUpreneurs and Online Course Creators

27 Filming And Video Creation Tips For Entrepreneurs, Edupreneurs and Online Course Creators
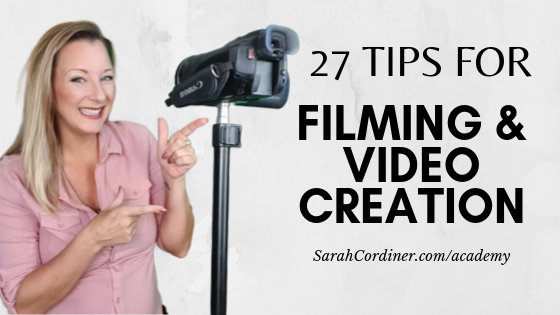
In this info-article, Online Course Creation teacher, Sarah Cordiner, provides 27 tips to help entrepreneurs, EDUpreneurs and course creators create videos to inspire, educate and engage your audience.
Whether you are video production pro, or completely new to the concept of creating videos, this article will help you get started or lift your game when it comes to filming and video creation for your business.
Video is The Way To Go
It’s no secret that those who are braving getting in front of the camera and creating videos, are the ones who are making the most money, are the most well-known in their sectors and are making the greatest impact with their audience.
You don’t HAVE to do it, but if you are not, you are missing out – and so are your current and potential customers.
Getting on video to deliver your learning content creates a much higher level of engagement and connectedness with your learner compared to just communicating your content via text, audio, PDFs or slides for example.
Human connection is critical in any human interaction, and in the online world the next best thing to being in person is to look directly into the eyes of your viewer – through the camera lens.
You can use Zoom to record your videos, but I use a video editing software called Camtasia.
Don’t miss out on the benefits of video
Online course instructors who avoid the camera and opt instead for text lessons, voice-over slides or voice-over-screen recordings without the webcam on, miss out on 55% of the potential connection they could create with their students. Connection that can only be created through human-visual stimulus – that is, eye-ball to eye-ball.
Video content has a much higher engagement rate, and online courses with video have higher completion rates and higher student reviews than those that do not.
By avoiding video, you are missing out on the potential of your impact, income and learner experience.
Yes, video can be scary
But of course, presenting on camera is scary, confronting, overwhelming and downright terrifying for many online course creators who are just getting started.
I still have a copy of my first ever camera presentation and you can literally see my legs physically shaking!
Nobody falls out of the womb a master of presenting on camera; it is a skill that must be learned, practised and honed overtime.
For some, it is just a case of ‘practice makes perfect’ and for others, there are much bigger hurdles of fear that must be overcome first.
However, there is only one way to getting confident and competent on camera – and that is simply to start.
I have another article on ‘overcoming the fear of filming your online course videos’ HERE.
Anyone Can Do It
Profitably sharing your expertise with people around the world via online courses has become exceptionally easy thanks to the internet and it’s multitude of free apps, tools and software.
There are now many highly affordable online learning platforms that allow you to create and upload course content, get students enrolled in your training programs, and profit in the process.
There are many ways that you can deliver educational content online, but video is by far your best choice when it comes to communicating your expertise.
In this article I share 27 filming and video tips to help entrepreneurs, edupreneurs and online course creators continue along the continuum of the course creation adventure.
Eye-Contact: Talk To The Viewer (through the lens)
1. Ensure You Have Eye-contact With The Camera Lens
If you wish to get the maximum possible connection with your students, looking at them ‘in the eyes’ is critical.
This means looking directly through the camera lens as you are presenting.
Not at the viewing-screen of yourself, not at your notes, not at whoever is standing behind your camera filming you.
Make sure that your eyes are well lit, clearly visible in full, and that the camera is well focused on your eyes.
You must look through the lens.
This is probably one of the most important video skills to master.
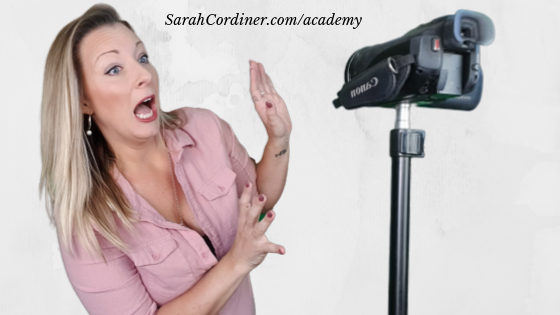
2. Don’t look at yourself
I know I just said this above, but it’s so important that it deserves being repeated in it’s own special section.
Look at the difference in this image example… in the left hand image below, I am looking into the lens. In the right hand image, I am looking at the ‘viewer screen’ of myself.
Not so bad in a photo, but a horrible viewing experience when it is a video. It just makes me want to scream “heelllloooooo I’m over heeerreeeeeee!!!!!”

Please also remember this if you are doing livestreams on social media (a great way to connect with your existing and prospective students).
I see so many excellent edupreneurs and thought leaders using livestream and sharing great content, but spend so much of the stream checking themselves out in their ‘screen reflection’, fussing with their hair or talking to their screen instead of at US, the viewers, through the lens.
It makes a very big difference to the viewer, whether they consciously notice it or not.
How would you feel if somebody was talking to you ‘face to face’, but was staring over your shoulder the whole time?? It’d be weird for you wouldn’t it?!
It’s the same when communicating with people via video.
So, always look directly into the lens – not at the camera screen of yourself!
Eye contact directly with the student is critical and ‘checking yourself out’ is a total video engagement turn-off.
3. Place your camera at eye-level
Do not look up or down at your students – make sure your camera is lined up at your direct eye-level, not above or below you.
If you have your camera above your eye level, you look ‘inferior’, ‘meak’ or ‘minor’ to your viewers, who will be looking down at you.
If you have your camera lens below your eye level, you will be looking down at your audience – making you feel overpowering and like your audience are ‘less than you’.
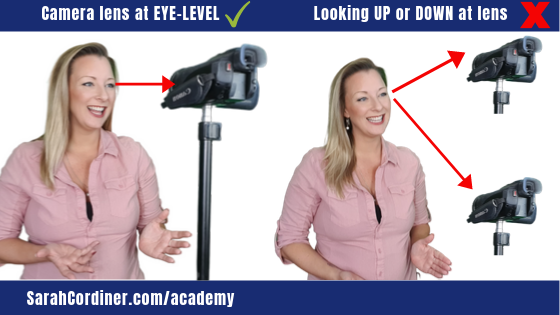
(For those wondering – yes that is a baby bump on me! I am 6 months pregnant!)
Stand (or sit) in front of the camera, with the camera lens aligned exactly at your eyeball-level and talk to the student/viewers from a position that makes them feel your complete equal.
A great way to do this is to use a tripod for your camera or mobile phone, which have some relatively inexpensive options available now.
Here is just one example of the kinds of tripods and light attachments that you can get for a very low price:
4. Prepare, but don’t read from a script
To give yourself a boost in confidence, it would be a good idea to prepare for and memorise your main points (note: main points only), although don’t read from a script.
I’d argue that you already ‘know your stuff’ innately and once you relax and let yourself have a decent bit of practice, it will all pour out of you perfectly.
It’s the biological and physiological effects of fear that makes us jumble up our words and forget what we were going to say – not any lack of ability, competence or brilliance as an online instructor.
Again, remember that only practice makes perfect; and nobody is great at anything that they’ve only just started doing.
Smile and ‘act’ confident, while also ensuring you cover everything that needs to be covered in a particular video.
5. Talk slowly and clearly
It is also important to talk slowly and clearly.
This one makes me giggle to myself, because if you’ve ever watched any of my videos, seen me present live or taken one of my online courses, you’ll know that I speak at a billion mile per hour!
However, when you talk too fast you risk everything you have to say blurring into one massive noise for a student, who in the cognitive flurry of trying to interpret and synthesise your message, can fail to decipher anything you are saying at all.
Talking too slowly and muffling can also be just as hard to understand, as well as making you come across as if you don’t know what you are saying.
Get to the point, but make sure you pause in the right places so that your audience have time to process what you said.
Sometimes I even like to say in my videos ‘now is a good time to press pause to take that in, take some notes or write down your thoughts before continuing the video’.
6. Turn your phone calls off
When using a smartphone or another mobile device with notifications and network capabilities as the recording device, remember to set your gadget to airplane mode while you are recording your videos.
This way, you can avoid any distractions during the session and ensure you only focus on the video content that you are shooting.
The other reason why is that some videos completely delete themselves if your phone rings part way through recording! Aaaarrgghhh!
7. Don’t turn your back on the camera
Do not turn your back to the camera or look away from the camera for too long.
If you are drawing on a whiteboard, for example, try to write ‘sideways’ facing, rather than completely turning the back of your head to the camera – and as you are writing, remember that you are still talking to the camera lens, not the whiteboard!
You must be forward-facing, with the front of your body directed at the camera as much as possible to get the maximum subconscious positive body language effects.
Here is a Livestream video I recently did in my Facebook Group ‘Entrepreneur to Edupreneur – Course Creators’ where I talk specifically about some tips for livestreaming videos:
Use The Right Equipment
Setting up professional video content with clear image and audio is important to ensure the satisfaction of every student who signs up for your course.
In addition to your own quality, if you intend to put your online courses onto public online course marketplaces, such as Udemy for example, there are very strict visual and audio quality checks that you must pass to sell from these multi-million student platforms.
There are SO many options out there though, that when it comes to creating videos and online courses, it’s enough to throw many people into the pit of eternal procrastination.
Don’t let it overwhelm you.
The truth is, you really don’t need much more than a mobile phone to create perfectly adequate videos – which means that there is no excuse even if you are on a cut-throat budget!
Focus on the following equipment to help you get started:
8. A smartphone
Mobile phones today have extremely good video quality, and are perfectly sufficient for creating tutorial videos for your online courses and social media.
If you are on a budget, your mobile phone is really the only tool you HAVE to have to get started.
Try to get an up to date phone with a good quality camera, press ‘record’ and start rolling!
Log in to some WiFi and you can livestream on social media, or upload your video recordings to your online school and YouTube directly from your phone!
Something is better than nothing!
If you already have a mobile phone, there are no excuses to getting on camera and producing your videos today!
9. A computer or laptop for editing and uploading your videos
A computer with a good processor/memory so that it won’t freeze and crash on you when you are processing large video files!
A powerful computer that is able to process video and audio, and allow you to make video edits without spending hours waiting for programs to load is an essential ‘next level’ for professional video and course creators.
Talk to your local computer store rep to discuss the best options for you.
Let them know that you create videos and as such will need a fast processor, RAM, and graphics card combination make it perfect for working with video content.
10. A Microphone for quality audio
Contrary to general assumption, good audio is actually more important than the visual quality when it comes to educational videos.
A lot of people watch videos from their mobile phones, so it is easier to get away with lower resolution videos, and it’s poignant to remember that video viewers are coming for the content, not the resolution of your retina.
Nobody cares about whether your hairline is slightly blurry if your content is good; but they will turn your video off if you sound like you’re presenting from inside a tin of baked beans.
If you intend to publish your courses on MOOCs, then your audio will be audited, so a microphone is an essential upgrade for those taking video creation to the next level.
10a) Lapel microphones:
‘Lapel’ microphones are small mobile microphones that can be clipped onto your shirt.
These are great if you want to record excellent audio when you are moving around, presenting on stage or are a distance away from a standing/wired microphone, and some are even wireless!
With a lapel mic, the rule of thumb is to clip it approximately one open hand length away from your chin to get just the perfect audio.
Here is a picture of the highly technical method I teach my course creation students when it comes to correctly placing their lapel mics:

For those that want to know, I use a Sony Bluetooth wireless lapel microphone (image below):
10b) Desktop microphones:
Desktop or free-standing microphones are great if you don’t plan to move around too much.
Good for recording podcasts, audio books, videos from your desk or if recording from a static position.
For those that want to know, the Blue Yeti USB Microphone is the desktop microphone that I use.
10c) Mobile phone microphones:
There are also microphones that you can attach to your mobile phone so that you can film from your phone and still ensure excellent audio quality. Great for those who love to produce videos on the run or when inspiration falls unexpectedly upon them out of the office.
Here is an example of a microphone that you can use with your mobile phone:
Finally – remember that ‘something’ is better than nothing so you can also just use the standard earbud headsets that come free with your mobile phone (or that you can buy for often less than $10 from a supermarket) provided that they have a microphone on them.
These drown out background noise and sounds much better than not having anything or just using the standard device audio.
11. Set Up Your Own Home Studio
With the myriad of affordable resources available today, it’s now possible to record studio-quality videos from your own home.
With a bit of cheap equipment, resources or handy improvisation skills, you can now set up a professional-looking filming studio, without leaving your bedroom, and anyone who is thinking about getting into video content creation should consider saving up their pennies for a ‘filming starter kit’.
These starter kits can include professional lighting, backdrops, backdrop frames
If you’re not quite ready for the ‘full kit and kaboodle’, below are some ways that you can create professional videos at home with a bit less.
12. Consider a Backdrop
A backdrop is simply a material, matt or vinyl sheet that ‘drops’ behind you from a frame when you are recording videos, to either give the illusion that you are ‘somewhere else’, or to create a solid block of colour behind you that will allow you to ‘remove that colour’ and instead replace it with powerpoint slides for example in the editing phase.
You can buy (or make) great backdrops to help provide a background effect on the videos that you will be shooting.
12a) Scenery Backdrops
If you prefer to have a ‘scene’ backdrop behind you, such as a plush-looking corporate office, a cosy library bookshelf, or bright geometric patterns – there are endless backdrops that you can buy to create a signature scene, or even keep it switched up without anyone ever knowing that you are just in your spare bedroom!
Here are some examples of scenery style backdrops available on Amazon just to give you some idea of what is out there:
12b) Chroma-Key Backdrops
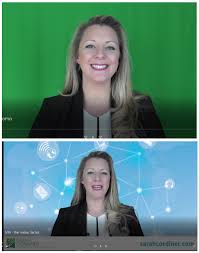
Green/Blue screens can be used along with video editing software in order to create a specific effect in the background once the video has been shot.
For example, the images below show videos where I recorded my video with a green screen behind me, and then in the editing phase, removed the green and replaced it with my powerpoint slides, pop-up text to highlight key points or a pretend office background.
You can get ‘pop out’ screens (which are my favourite as they don’t wrinkle), or fabric ones (which are cheaper but usually require ironing before use, which I’m not a big fan of!
Here are some examples:
13. Create a DIY ‘Film Set’
This is where you might ‘design’ a little area of your house or workplace to look like a television talk-show set, for example.
You could even hire a hotel function room or posh AirB&B to get that 5-star-setting look on a budget.
Firstly, make sure that wherever you are going to create your ‘film set’ that there will be no distractions, no people walking or talking nearby, no planes flying over head or dogs hanging about (woof woof).
Set up your equipment and do a test recording in the area where you will be shooting the video content.
Take a closer look at the lighting and make sure that the area allows your video content to come out crystal clear.
Then consider the ‘feel’ you want to create for your viewer (eg professional, or relaxed/casual?) and start to bring in the furniture and props accordingly.
Think about colours, shapes, and their combinations – don’t put so many ‘props’ in your scenery that you distract your students away from you.
Less is usually more.
It’s about what you are teaching, not what spangly decorations you have.
Here is an example of how I turned a budget motel room that I was staying in whilst doing some training workshops in remote Australia, into a studio!
My phone was on a little travel tripod, I moved the furniture around a bit so that I was positioned in front of the window, made my bed, stuck a couple of books on the bedside table as props and voila! The cheap motel room became a studio for my online courses!
I recorded my entire online course “How To Write and Self-Publish Your Own Best-Selling Print Book and eBook” from this motel room!
Here is a another example of when I needed to do some testimonial videos for my Course Creation Bootcamp – this was just a lounge room of the AirB&B I had hired to run the bootcamp from, where I simply re-arranged some of the furniture to ‘look pretty’:
And most recently, a client came to my home town to create her online course in my ‘One Day Course Creation Set Up’ and we made a little studio in her hotel apartment by just re-arranging the furniture that was already there and ordering a fruit platter from the kitchen!:
14. Ensure your videos have lots of light
Don’t forget to use natural light to your advantage.
Record in front of big windows with the light hitting your face – NOT with your back to the window (this will make you look like a silhouette).
Also, do not film in direct sunlight – this can cause awkward face shadows and squinting, all which block direct eye contact with your viewers and diminishing the potential connection.
The same of course can happen with your studio lighting – make sure the studio lights do not cause any shadows around our eyes (making you look like an over-tired panda bear!).
Keep your lighting positioned at your eye level to avoid any face shadows.
Make Friends With Tech
15. Brush Up Your Tech Skills
Anything that is new to us, is scary and confusing – of course it is, we havn’t learned it yet!
Just because you havn’t learned how to use a piece of technology yet, doesn’t mean that you are incapable of learning it.
I sooooo frequently hear my clients say to me ‘but I’m not techy’.
I ask them if they’ve ever learned how to use any technology and they say ‘no, because I’m not techy’!
How can you be ‘techy’, if you’ve never touched anything ‘techy’ yet??!!
Give yourself a chance, this stuff takes time and practice, not some miraculous genetic gift crafted by the Gods of an intergalactic universe.
Just plain and simple exposure and practice.
So with that in mind, consider that a little bit of learning is your next step on the journey to becoming a video and/or course creator.
While having the best equipment in your home studio is a great way to ensure you are able to produce high-quality video content, these products will all be useless, unless you take a deep breath and learn how to use them effectively.
If you are not already experienced in audio and video recording, as well as editing, then get it out, have a play with it and don’t be afraid to get it wrong a few times first.
I’m yet to meet a professional course creator who didn’t once record a whole heap of video with the microphone turned off!
See if you can find a couple of online courses to teach you how to create great video content.
These can help you understand how to set up your home studio, as well as how the various equipment works so that you can start creating with confidence and getting better with every shoot.
If you can’t find any online courses, YouTube has endless tutorials to help kick start your video creation mastery.
16. Familiarise yourself with video editing tools
In addition to learning how the physical filming and studio equipment works, you can then start practising with video editing software to get your videos looking extra fancy-pants.
There are lots of different video editing tools available out there today, and my best advice is to do a bit of research, join a couple of free trials and see which one clicks with you personally.
I personally use Camtasia, but here are just a couple that you can check out as part of your exploring:
- Camtasia ($$$)
- Movavi ($$)
- Final Cut Pro ($$$)
- DaVinci Resolve (free)
- Lightworks ($$$)
- HitFilm Express ($$$)
You can even use the free software loaded by default onto Macs and Microsoft such as iMovie (free) and Windows Movie Maker (free) – although these have less features than the paid software, obviously.
There are some great YouTube tutorials and online courses on how to use basic technology and equipment for filming your online course videos.
Here is a video tutorial I recorded on how to use Camtasia to remove a green screen background, add powerpoint slides and pop up text into a video:
**Note, this video is an extract from my online course “How To Create Profitable Online Courses”
If you haven’t taken my online course “How To Create Profitable Online Courses”, this is a great place to start, but some things you may want to consider watching some tutorials on include:
- How to use your camera/recording device (type in the exact make and model of your device) and you’ll find easy tutorials on how to use it effectively
- How to set up good lighting for videos
- How to edit videos using (insert the editing tool you have).
Plan Your Video Content
17. Create highly searched-for video content
Make sure your videos, whether for online courses or social media, contain the answers to the questions that your audience are typing into Google.
I like to use keyword search tools and key phrase curators to tell me what questions my audience are asking on Google, and I then create videos that directly answer the most commonly asked questions ‘out there’ in the world right now.
This ensures that my videos will be in high demand and have the maximum chance of searchability and popularity.
If you would like some tips on how to find endless high-demand content for your videos, join my online course ‘How To Create Profitable Online Courses’.
18. Don’t read from a script
Should you script your online course videos or not?
As mentioned earlier in this article, I personally advise online course instructors to avoid using scripts if at all possible.
When you read, you can come across as robotic and inauthentic.
Being ‘natural’ and letting your thoughts and knowledge just flow is much more enjoyable and engaging for your students.
However, for some online course creators, especially those just starting out, not having a script can be extremely nerve-wracking; but give yourself more credit – you know your stuff.
You know your content.
The more you get used to being in front of the camera, the more the brain-freeze will fade and your genius will flow.
It.just.takes.practice.
19. If you must read, use a teleprompter
If having a script is really important to you, you can use a teleprompter, which you can hire or purchase at pretty affordable prices nowadays.
Just be careful that you don’t spend more time focusing on your reading skills than you do on your delivery and teaching skills.
Here is an example of a teleprompter set:
20. Don’t just ‘wing it’
However, not having a plan at all can cause you to stray from the learning outcomes and waffle more than you need to.
I recommend that as part of your online course planning process, online course creators develop a detailed course outline for the content that they would like to include in the course that they are going to offer their students.
This includes the key points and messages that must be conveyed in your videos to ensure that the learning outcomes are met and that your videos stay on point.
You can create your online course plan in my FREE 5 day ‘Create Your Course Plan’ mini-course.
When you have such an outline, you know precisely what you need to deliver in each video and are most likely to wow your audience.
21. Keep your videos short and ‘to the point’
I always recommend that online course instructors only deliver one key learning point per video so that it is easily consumed by your learner, as well as easy for you to stay on track when filming.
You can simply put 2-3 bullet points on post-it notes beside your camera to remind yourself of what you need to say in that video to get the one key outcome met.
This way, you will have a key point reference, but you will be able to talk freely and use your own expertise and personality to deliver the content of your video as you go along.
If you want to know more about how to get the perfect video length, you can read this article I wrote here: “How Long Should Your Online Course Videos Be?”
22. Know How To Structure Your Tutorial Videos
When it comes to filming and recording online course videos, understanding how these videos need to be laid out is also important. Just ‘talking and babbling along until you run out of things to say is not sufficient.
There will usually be different types of videos that make up your course.
In addition to a couple of videos where you talk to the student, explain to them what to expect, or perhaps help them understand certain terms, you will also be filming tutorial videos.
Make sure that there is a logical structure to the videos that you post.
There is no set rule to what this structure should be, but a rule of thumb is:
- Tell them what you are going to tell them (what is your video about)
- Tell them (give them the info)
- Tell them what you’ve told them (summarise)
Create your own unique structure if you want, but make sure that you always start by letting people know what the video is about (nobody settles into watching mystery content); and if you deliver more than one tip, it must build on what has already been taught – eg make sure ‘step 1’ comes before ‘step 2’.
23. Short video structure suggestion (1-3mins)
There is no right or wrong to how a video should be structured, but here is an overview of a short video structure guideline (most popular with students right now):
- Open with the topic/title of that video and what you are going to share with them
e.g., “Online course plans. In this video, I am going to show how to create your own course plan to get your online course ready for filming.”
- Then get straight to delivering the tip, piece of knowledge or the guided demonstration of what they need to learn
- Give a brief example to contextualize the new information
- Then tell them what to do next (a task, action or what video is next)
The structure for longer videos is different, and if you take my online course “How To Create Profitable Online Courses” I walk you through much more detailed training video content structuring.
24. Have Confidence On Camera
Confidence on camera is critical.
When you appear confident while you are recording the video content, you show your student that you know exactly what you are talking about.
Remember that confidence is not necessarily ‘big, bold and loud’. It just means calm, relaxed, comfortable, self-assured.
In ensuring that your viewers have no doubt in you, you should show no doubt about what you are saying or explaining.
Practising how to appear confident then, is another skill to master.
Note the word ‘appear.’
Although the first few times you stare down the lens, you will definitely experience a sense of terror, fear, sweating, you may freeze up (all natural signs of your body trying to protect itself from the unfamiliar setting).
But, your body will eventually realize that the camera is not a physical danger to your life and the physiological symptoms will eventually recede.
This is where your acting skills need to come in until your body catches up with you.
People cannot necessarily ‘see’ how we feel, and so, you can train yourself to step into the role of an actor/actress each time you step in front of the camera.
We do actually need to be ‘a bit more ‘us’’ when we are on camera to engage our viewers, as our energy and personality gets cut by about 50% as it filters through the lens.
So when filming, make sure that you turn up your natural personality; add in the extra smile, the slightly bigger gestures (without becoming an Italian pizza-thrower), the assorted but balanced tone of voice (avoid the upward, higher-pitched intonations at the end of sentences!) and a friendly but assured tone of voice.
If it helps, pretend that you are stepping into another personality, that of a character who’s part you are playing in a movie.
No matter how nervous you might feel, just remember that the students only see what you show, and with a little practice, this can be pure, unwavering confidence with lashings of likeability.
Remember that you are the expert here and the student has come to you to learn a new skill or educate themselves on a new topic.
If you do not seem confident, then the student will be less likely to feel like they can trust what you say on camera.
Don’t forget to let your personality shine – remember who your audience is and just be yourself (+50%!).
Think of how you would behave if you were physically in a room with them face to face.
Don’t try to all of a sudden become a newsreader or a commercial presenter – you are ultimately conversing with other human beings, so talk to the camera like you are talking to a friend, a familiar colleague or a client that you like and respect.
Be animated, energetic, and bubbly – without being ‘OTT’ or garishly ‘loud.’
If you are looking for a little more course creation confidence, you might like my book on Finding Your Course Creation Motivation ‘Awaken Your Course Creation Mojo’.
25. Storing and Organising Your Online Course Videos
Keeping organised and ensuring that you have safe backups of all your hard work is critical – after all, you don’t want to go to all the effort of designing, preparing, filming and editing your videos, to then lose them all when your cat sits on your keyboard. In my free mini-course “Create Your Course Plan” and also in my most popular online course “How To Create Profitable and Engaging Online Courses” I take you through how I use my course plan document, manage and organise my videos, which makes the uploading and marketing later much easier.
But as a quick tip, make sure your videos are numbered, titled with the lecture heading and backed up.
I like to use Google Drive to save my videos as this means that I can share them with staff or contractors easily and importantly I can access them from any device.
I also have an add-on service called ‘Backupify’ which stores another copy of all my drive content on a separate server for extra safety.
The other great thing about Google Drive is that the online course learning management system I currently use (Thinkific) allows you to import your videos directly from Google Drive into the learning platform!!
This saves having to go through the agony of uploading your videos all over again (especially if you are in Australia where the internet is slower than a drunk slug).
26. Make the Most of Your Videos
Why create just one video if you could be creating endless pieces of content?
Use your videos to become a content creation machine!
If you deliver your tutorial video via a live stream, download it as an MP4 then re-upload it to your various social channels or online school.
Then get the video transcribed and turn it into a blog post for your website or a guest article elsewhere.
Read this article for more tips on how to turn one piece of content into many pieces.
27. Practice Makes Perfect
Some of my first videos were pretty cringe-worthy, but they are a great reminder of how quickly we can master a new skill.
As much as many course creators cringe when I suggest this, it is essential that you watch back videos of yourself as often as possible.
Watch your body language, listen to your tone of voice, check for your smile, assess your hand gestures.
The more you watch yourself (and remain constructive) about your areas for improvement rather than self-critical), the better you will get.
I used to take my mobile phone out to the park near my house, tape it to a tree and talk at it for an hour, then go home and watch it back to see how I could improve.
Never stop doing this; you are your own best teacher.
Second, watch other people that you are drawn to, that you like, respect and who your audience is likely to be drawn to, like and respect too, and see if you can identify, adapt and model some of the presentation style traits that you are attracted to yourself.
Mastering the skill of presenting on camera can only come with practice, so just keep on filming – and PUBLISHING those videos now, and watch yourself transform with time!
Conclusion
Video is by far the highest converting, engaging, transformative way to deliver your content online.
While it might seem daunting, especially when you first start learning; be assured that with plenty of practice, trial and error, you CAN and WILL become a fabulous video presenter and producer.
If you are planning to get your first videos out there, or turn your expertise into an engaging and profitable online course, then don’t forget to take advantage of the special offer that I currently have on my online course “How To Create Profitable and Engaging Online Courses” which is currently only $97 for lifetime access, instead of the usual price of $297!
If you found this article helpful, it would be wonderful if you could share it!
Happy video creating!
Sarah x
How Sarah Cordiner Can Help You Scale Your Business with Tech, AI, and Automation
Tech doesn't have to be hard or scary. I help you make it easy to learn, fun to implement, and even better to see the amazing results that you can get with some simple tech tools and strategy.
Here are all of the different ways that I can help you scale your business, streamline your operations, and make your bottom line full of joy using tech, AI, and automation (as well as traditional methods) as your secret weapon.

Tekmatix is an AI-powered all-in-one business platform that includes your website, funnels, CRM, courses, memberships, social media scheduling, email marketing, AI agents, AI employees, calendar and appointment booking system, automations, and much more.
My FAVOURITE Business Software in the WORLD: Tekmatix all-in-one business platform..

TekMatix is the market-leading all-in-one business platform, CRM and course creation platform.
Business Owners, Course Creators, Coaches, Speakers & Service Providers: Looking for a platform to run your business??
Tekmatix is the solution you've been waiting for!
Tekmatix is an all-in-one business platform that combines all of the features of over 21 different software - in ONE place, for ONE price.
With Tekmatix, you get:
???? AI Employees, Bots and AI Voice Receptionists
???? Websites & Funnels
???? Courses and memberships
???? CRM & Client Records
???? Tap and Pay (EFTPOS) on your phone
???? Unified inbox - all your emails and DMs in one place
???? Calendar appointment booking
???? Social media scheduler
???? Kanban boards
???? Task manager
???? Automations & AI workflows
???? Project management
???? Communities
???? Email marketing
???? SMS & phone
???? Invoices and quotes
???? Contracts and signed docs
???? Affiliate program
???? Forms & quizzes
???? Blogging
???? Sales pipeline management
???? Ecommerce & physical goods
???? Mobile App
...and MUCH MORE!
You also get:
- FREE account set up
- 24/7 FREE customer support
- FREE daily live training calls
- The most awarded all-in-one business platform in based Australia - with customers in over 18 countries
....and the largest GHL-based platform in Australia... (and WAY MORE than 'just a whitelabel').....
We've built funnels, automations and websites specifically for course creators, coaches, speakers, membership site owners and service providers GLOBALLY.
All the hard work done for you.
We even have a FREE TRIAL available for you to check it out with no obligation;
....and our plans are available in AUD, USD and GBP!
GET A FREE DEMO CALL AND TRIAL HERE: Tekmatix.com


